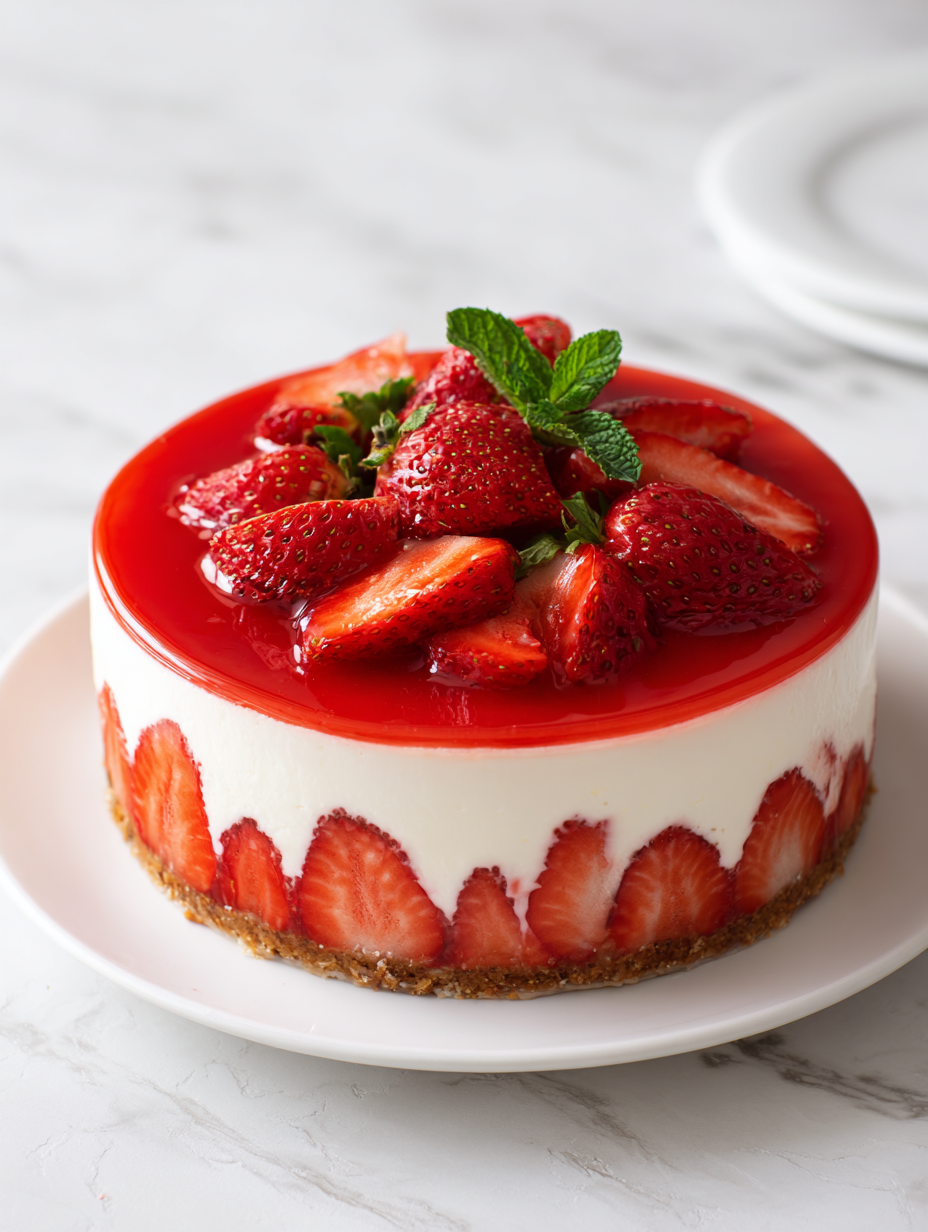
Author: Oliver

  • Meghan Markle’s Zucchini Bolognese: A Garden-Inspired Twist

    Meghan Markle’s Zucchini Bolognese: A Garden-Inspired Twist

    This recipe is a bit of a rebellion against the usual heavy sauces. Using zucchini as the main ingredient feels like a fresh, sneaky way to get more vegetables into a familiar form. It’s a dish that embraces the chaos of a busy kitchen, where adaptability is key. Plus, it’s a perfect way to celebrate summer’s produce while keeping comfort food vibes.

    Why I keep returning to this zucchini bolognese.

    It’s quick, forgiving, and feels like a warm hug after a long day. The garden-fresh zucchini keeps it feeling light yet satisfying. Plus, it’s a reminder that simple ingredients, treated well, can surprise you with their versatility.

    Breaking down the garden’s bounty.

    • Zucchini: Fresh, summer squash that becomes tender and juicy, adding subtle sweetness and moisture.
    • Onion: Builds a sweet, savory base, and makes the sauce more rounded.
    • Garlic: Fills the kitchen with a pungent, fragrant aroma, adding smoky depth.
    • Crushed tomatoes: Provides bright acidity and body; go for ripe or canned for best flavor.
    • Red pepper flakes: Adds a gentle heat that wakes up the dish without overpowering.
    • Balsamic vinegar: A splash brightens the sauce with a lemony, smoky tang.
    • Olive oil: Rich, fruity oil that helps sauté and brings everything together.

    Tools of the trade for zucchini bolognese.

    • Large skillet: To cook the vegetables and sauce evenly.
    • Grater: To finely shred zucchini for a noodle-like texture.
    • Wooden spoon: For gentle stirring and preventing sticking.
    • Measuring cups and spoons: To keep ingredients balanced.
    • Knife and chopping board: For prepping onions and garlic.

    Step-by-step: Crafting the zucchini bolognese from scratch.

    Step 1: Start by grating two medium zucchinis finely, almost like noodles. This creates the base for our sauce and keeps it light.

    Step 2: Heat a large skillet over medium heat, add a splash of olive oil, and sauté finely chopped onions until translucent—about 5 minutes.

    Step 3: Add minced garlic and cook until fragrant, about 30 seconds. Then, toss in the grated zucchini and cook until it releases its juices and softens, around 8 minutes.

    Step 4: Stir in canned crushed tomatoes, a pinch of red pepper flakes, and a splash of balsamic vinegar. Let simmer gently for 15 minutes, stirring occasionally.

    Cooking checkpoints and tips for perfection.

    • Zucchini should be tender but not mushy—test by pressing with a spoon.
    • Sauce should be bright and slightly thickened—if too watery, simmer a few more minutes.
    • Smell the garlic and tomatoes—if it smells burnt or dull, reduce heat and stir more frequently.

    Common pitfalls and how to fix them.

    • Overcooking zucchini until it’s mushy.? Add a splash of water if the zucchini sticks and burns.
    • Garlic turning dark and bitter.? Reduce heat immediately to prevent burning garlic.
    • Sauce not thickening enough.? If sauce is too watery, simmer uncovered longer.
    • Sauce tasting flat.? Use fresh tomatoes or a good quality canned crush for richer flavor.

    Zucchini Bolognese

    This zucchini bolognese uses finely grated zucchini as a light, vegetable-packed base for a quick tomato sauce. Sautéed onions and garlic develop a savory aroma, while crushed tomatoes and spices create a bright, slightly thickened sauce. The final dish showcases tender zucchini noodles coated in a flavorful, vibrant sauce with a hint of heat and tang.
    Prep Time 10 minutes
    Cook Time 25 minutes
    Total Time 35 minutes
    Servings: 4
    Course: Main Course
    Cuisine: Mediterranean
    Calories: 180

    Ingredients
      

    • 2 medium zucchini finely grated
    • 1 medium onion finely chopped
    • 3 cloves garlic minced
    • 1 can crushed tomatoes preferably ripe or canned
    • 0.5 teaspoon red pepper flakes adjust to taste
    • 1 tablespoon balsamic vinegar brightens the sauce
    • 2 tablespoons olive oil for sautéing

    Equipment

    • Large skillet
    • Grater
    • Wooden spoon
    • Measuring cups and spoons
    • Knife and chopping board

    Method
     

    1. Start by finely grating the zucchinis using a grater, creating noodle-like strands that will form the base of your sauce.
    2. Heat a large skillet over medium heat, then add a splash of olive oil. Once shimmering, add the chopped onions and sauté until they become translucent and fragrant, about 5 minutes.
    3. Add the minced garlic to the skillet and cook for about 30 seconds until fragrant, stirring constantly to prevent burning.
    4. Stir in the grated zucchini and cook, stirring occasionally, until the zucchini releases its juices and softens, about 8 minutes. It should look tender and slightly wilted.
    5. Pour in the crushed tomatoes and add a pinch of red pepper flakes, stirring to combine everything evenly.
    6. Bring the sauce to a gentle simmer and add a splash of balsamic vinegar. Let it cook uncovered for about 15 minutes, stirring occasionally until it thickens slightly and the flavors meld.
    7. Taste the sauce and adjust the seasoning if needed—adding more red pepper flakes for heat or more vinegar for brightness.
    8. Once the sauce has thickened to your liking and the zucchini is tender, remove from heat and serve hot, ideally over pasta or as a standalone vegetable dish.
    This dish is a raw, honest attempt at turning garden bounty into something cozy. The zucchini’s oozy texture paired with bright tomato and garlic flavors feels like a quiet triumph. Feel free to tweak the spice or add grated cheese—whatever makes it yours. It’s a simple reminder that good food often comes from humble beginnings, and that’s worth savoring.

  • Oprah Winfrey’s Turkey Chili: A Cozy, Unpretentious Classic with a Twist

    Oprah Winfrey’s Turkey Chili: A Cozy, Unpretentious Classic with a Twist

    This turkey chili comes from a place of honest kitchen improvisation. I’ve always loved the idea of a leaner, more mindful version of chili that still satisfies the soul. It’s perfect for those days when you want comfort without the heaviness, but with plenty of flavor to keep you warm inside out.

    Why this chili keeps calling me back

    It’s the way the flavors deepen overnight, becoming richer and more complex. I love the simplicity of the ingredients, yet how comforting and real it tastes. It’s perfect for busy weeknights or lazy weekends, and always makes the house smell like a warm hug.

    Breaking down the ingredients

    • Ground turkey: Lean meat that adds subtle flavor; it needs good seasoning to shine.
    • Crushed tomatoes: The base, bringing acidity and sweetness; opt for a good quality brand.
    • Kidney beans: For texture and protein; rinse to remove excess salt.
    • Chili powder: A warm, smoky spice that defines the dish’s character.
    • Cumin: Earthy and aromatic; a little goes a long way.
    • Smoked paprika: Adds a subtle, smoky depth and color.
    • Onions and garlic: The flavor backbone, fragrant and essential.
    • Chicken broth: Dilutes and enhances flavors; use low-sodium if possible.
    • Optional toppings: Cheese, sour cream, cilantro—add at the end for freshness and creaminess.

    Tools of the trade for chili perfection

    • Large heavy-bottomed pot: For even heat distribution and slow simmering.
    • Wooden spoon: To stir without scratching the pot.
    • Measuring spoons and cups: For accurate seasoning.
    • Knife and chopping board: Prepping veggies and turkey.
    • Can opener: Opening tomatoes and beans.

    Step-by-step for a soulful, hearty chili

    Step 1: Heat a large heavy-bottomed pot over medium heat, about 180°C (355°F).

    Step 2: Add olive oil, then toss in chopped onions, cooking until translucent, around 5 minutes.

    Step 3: Stir in minced garlic, cook for 30 seconds until fragrant.

    Step 4: Add ground turkey, break it apart with a spoon, cook until browned, about 8 minutes.

    Step 5: Pour in crushed tomatoes, kidney beans, and a splash of chicken broth.

    Step 6: Season with chili powder, cumin, smoked paprika, salt, and pepper.

    Step 7: Bring to a gentle simmer, lower heat to medium-low, and cook uncovered for 30 minutes.

    Step 8: Taste and adjust seasoning, maybe a pinch more salt or a dash of hot sauce.

    Step 9: Let the chili rest for at least 10 minutes to meld flavors.

    Step 10: Serve hot, topped with shredded cheese, sour cream, and chopped cilantro.

    Cooking checkpoints and tips for success

    • Onions should be soft and translucent, not browned.
    • Ground turkey must be fully cooked, no pink visible.
    • The chili should be bubbling gently, not boiling vigorously.
    • Taste before serving and adjust seasoning as needed.

    Common mistakes and how to fix them

    • Cooking the chili on too high a heat, causing burning.? Add more liquid if chili becomes too thick and sticks to the pan.
    • Over-seasoning at the start, overpowering the dish.? Reduce heat and stir frequently to prevent sticking and scorching.
    • Forgetting to taste before serving, missing out on flavor tweaks.? Taste and adjust seasoning at the end to balance flavors.
    • Using too much broth, making the chili soupy.? If the chili is too watery, simmer uncovered longer or add a bit of tomato paste.

    Turkey Chili

    This turkey chili is a hearty, comforting dish made with lean ground turkey, crushed tomatoes, and kidney beans, simmered with smoky spices. It has a rich, deep flavor that develops overnight, resulting in a thick, flavorful stew with a slightly chunky texture. Topped with cheese, sour cream, and cilantro, it’s perfect for cozy weeknights or relaxed weekends.
    Prep Time 10 minutes
    Cook Time 40 minutes
    Total Time 50 minutes
    Servings: 4
    Course: Main Course
    Cuisine: American
    Calories: 350

    Ingredients
      

    • 1 tablespoon olive oil
    • 1 medium onion finely chopped
    • 3 cloves garlic minced
    • 1 pound ground turkey
    • 28 oz crushed tomatoes good quality
    • 15 oz kidney beans rinsed and drained
    • 2 tablespoons chili powder
    • 1 teaspoon cumin
    • 1 teaspoon smoked paprika
    • 1 cup chicken broth low-sodium preferred
    • to taste salt and pepper
    • optional shredded cheese, sour cream, cilantro for topping

    Equipment

    • Large heavy-bottomed pot
    • Wooden spoon
    • Measuring spoons and cups
    • Knife and chopping board
    • Can opener

    Method
     

    1. Heat a large heavy-bottomed pot over medium heat, then add the olive oil until shimmering.
    2. Add the finely chopped onion and cook, stirring occasionally, until it becomes soft and translucent, about 5 minutes. You should smell a gentle aroma of cooking onion.
    3. Stir in the minced garlic and cook for another 30 seconds until fragrant, hearing a slight sizzle and smelling the garlic’s aroma.
    4. Add the ground turkey to the pot, breaking it apart with your wooden spoon as it browns. Cook until no pink remains, about 8 minutes, until the meat is evenly browned and slightly crispy on the edges.
    5. Pour in the crushed tomatoes, kidney beans, and chicken broth into the pot. Stir everything together to combine evenly. You’ll notice a vibrant, colorful mixture begin to form.
    6. Sprinkle in the chili powder, cumin, smoked paprika, and season with salt and pepper. Mix well, ensuring the spices are evenly distributed, and the mixture starts to darken slightly in color.
    7. Bring the chili to a gentle simmer, then reduce the heat to medium-low. Let it cook uncovered, stirring occasionally, for about 30 minutes until it thickens and the flavors deepen. You’ll notice bubbling softly and a rich aroma filling the kitchen.
    8. Taste the chili and adjust the seasoning with more salt, pepper, or hot sauce if desired. Stir to incorporate any additions, then let it rest for at least 10 minutes so the flavors meld together.
    9. Spoon the hearty chili into bowls, and top with shredded cheese, a dollop of sour cream, and chopped cilantro for freshness and creaminess. Serve hot and enjoy the comforting flavors.

    Notes

    For an even richer flavor, make the chili a day ahead and reheat. The flavors will deepen overnight, making the dish even more satisfying.
    This chili isn’t just a meal; it’s a warm hug on a chilly day. The slow simmer deepens the flavors, making each spoonful a gentle reminder of home cooking. Feel free to tweak the spices to match your mood or pantry—this recipe welcomes improvisation. Enjoy it with a side of cornbread or a simple green salad for a complete, comforting meal.

  • Lasagna Soup Recipe: A Cozy Twist on Classic Comfort

    Lasagna Soup Recipe: A Cozy Twist on Classic Comfort

    Lasagna soup is my go-to when I want comfort but don’t want to spend hours layering and baking. It’s a clever way to get all that cheesy, meaty goodness in one bowl. Plus, it’s a crowd-pleaser, even for folks who usually shy away from soup.

    This dish is like a warm hug after a long day, especially when the air turns crisp. I love how the noodles soak up the rich tomato broth, becoming tender and flavorful with every sip. It’s a recipe that’s easy to tweak—more spice, extra cheese, or a handful of spinach—whatever makes it feel like yours.

    Why I Keep Coming Back to This Recipe

    It’s the kind of dish that satisfies in a way that’s both nostalgic and practical. It’s forgiving, quick, and endlessly customizable. Every spoonful reminds me that cozy comfort doesn’t have to be complicated or time-consuming.

    Breaking Down the Ingredients

    • Crushed tomatoes: They form the base of the soup, providing a bright, tangy flavor.
    • Lasagna noodles: Broken into pieces, they soak up the broth, adding hearty texture.
    • Ricotta cheese: Creamy and mild, it balances the acidity of the tomatoes.
    • Mozzarella cheese: Melted on top, it gives that cheesy, gooey finish.
    • Fresh basil: Adds a fragrant, herbal note that lifts the whole dish.
    • Garlic and onion: Build the savory foundation with their pungent, aromatic presence.
    • Olive oil: Sauté base ingredients and add richness to the broth.

    Tools of the Trade

    • Large heavy-bottomed pot: To hold the broth, noodles, and all the flavors comfortably.
    • Sharp knife: For chopping onions, garlic, and herbs quickly and safely.
    • Grater: To shred cheese efficiently for melting and topping.
    • Wooden spoon: For stirring without scratching your pot and feeling the textures.

    Step-by-Step to a Warm Bowl of Lasagna Soup

    Step 1: Start by gathering all your ingredients. Chop the onions, garlic, and herbs. Have your cheeses grated and ready to go.

    Step 2: Heat a large pot over medium heat. Add a splash of olive oil, then sauté onions and garlic until they’re soft and fragrant, about 5 minutes.

    Step 3: Pour in the broth and crushed tomatoes. Bring to a simmer, then add your herbs and seasonings. Let it simmer for 15-20 minutes, stirring occasionally.

    Step 4: Add broken lasagna noodles directly into the soup. Cook for about 10 minutes until al dente. Stir in ricotta and shredded mozzarella for creaminess.

    Step 5: Taste and adjust salt and pepper. Serve hot, garnished with fresh basil or parsley.

    Cooking Checkpoints & Tips

    • Noodles should be just tender, not mushy. Keep an eye after 10 minutes of boiling.
    • Broth should be vibrant and slightly thickened, not watery. Adjust with more broth or simmer longer.
    • Cheeses should melt smoothly, creating a creamy texture without clumping. Stir consistently.
    • Herbs should be fresh and bright, added at the end to preserve their flavor and color.

    Common Mistakes & How to Fix Them

    • Noodles turn mushy before the soup is ready.? Add more broth if noodles absorb too much and become sticky.
    • Soup starts to burn or stick to the bottom.? Lower heat and cover the pot to prevent scorching and uneven cooking.
    • Cheese clumps and doesn’t melt smoothly.? Stir in cheeses gradually to prevent clumping.
    • Soup is bland or overly salty.? Taste and adjust seasonings before serving.

    Lasagna Soup

    Lasagna soup combines the comforting flavors of traditional lasagna into a hearty, flavorful broth with tender noodles, melted cheese, and fresh herbs. It is made by simmering tomatoes, garlic, and onions, then adding broken lasagna noodles and creamy cheeses for a rich, satisfying texture. The dish is topped with gooey mozzarella and fresh basil, creating a cozy, bowl-warming meal perfect for crisp days.
    Prep Time 10 minutes
    Cook Time 30 minutes
    Total Time 40 minutes
    Servings: 4
    Course: Main Course
    Cuisine: Italian
    Calories: 350

    Ingredients
      

    • 1 medium onion chopped
    • 3 cloves garlic minced
    • 4 cups chicken or vegetable broth
    • 28 oz crushed tomatoes
    • 8 oz lasagna noodles broken into pieces
    • 1 cup ricotta cheese
    • 1 cup mozzarella cheese shredded
    • 1/4 cup fresh basil chopped
    • 2 tablespoons olive oil
    • to taste Salt and pepper

    Equipment

    • Large heavy-bottomed pot
    • Sharp knife
    • Grater
    • Wooden spoon

    Method
     

    1. Begin by chopping the onion and mincing the garlic. Grate the mozzarella cheese if needed, and chop the fresh basil. Have everything ready before you start cooking.
    2. Heat a large heavy-bottomed pot over medium heat and add olive oil. Sauté the chopped onion and minced garlic until fragrant and translucent, about 5 minutes. You should hear a gentle sizzle and see the onions turn soft and slightly golden.
    3. Pour in the broth and crushed tomatoes, stirring to combine. Bring the mixture to a gentle simmer, then add a pinch of salt and pepper. Let it simmer uncovered for 15-20 minutes, stirring occasionally, until the flavors meld and the broth slightly thickens.
    4. Add the broken lasagna noodles directly into the simmering broth. Stir gently and cook for about 10 minutes, or until the noodles are tender but not mushy. Keep an eye on the texture and stir occasionally to prevent sticking.
    5. Stir in the ricotta cheese until it melts into the soup, creating a creamy, luscious texture. Then, add the shredded mozzarella and chopped basil. Stir gently until the cheeses are melted and evenly distributed, about 2 minutes.
    6. Taste the soup and adjust the seasoning with salt and pepper as needed. Once everything is heated through and the cheeses are creamy, remove from heat.
    7. Ladle the hot, cheesy soup into bowls. Garnish with additional fresh basil or parsley if desired. Serve immediately, enjoying the comforting flavors and tender noodles in every spoonful.

    Notes

    For extra flavor, add a pinch of red pepper flakes or a drizzle of olive oil before serving. Feel free to stir in spinach or swap out cheeses to customize your soup.
    This soup is a warm embrace on cold nights, a reminder that comfort food can be quick and easy. Feel free to swap out the cheeses or add a splash of hot sauce for a kick. It’s simple enough to make on a weeknight but rich enough to serve to guests. Enjoy customizing it to your taste, and savor each spoonful.

  • Taco Soup Recipe: A Cozy Twist on a Classic Comfort Dish

    Taco Soup Recipe: A Cozy Twist on a Classic Comfort Dish

    Taco soup is one of those recipes that feels like a warm hug in a bowl, especially when you’re craving something hearty but not heavy. I love how flexible it is, turning pantry staples into a vibrant, satisfying meal in under 30 minutes. Plus, it’s a perfect way to clear out the fridge without fussing over perfect ingredients.

    Why I Keep Coming Back to This Taco Soup

    It’s the kind of meal that makes me feel cozy and resourceful. It’s quick, forgiving, and always hits the spot on busy nights. Plus, it’s a perfect canvas for experimenting with different ingredients or toppings, keeping it fresh each time.

    Breaking Down the Key Ingredients

    • Ground beef: I like it browned until crispy, adds richness, but turkey or lentils work for a lighter version.: Switching meats is fine, but watch cooking times to keep texture intact.
    • Diced tomatoes: I use fire-roasted for smoky depth, but plain canned work well too.: Look for bright, ripe flavor—adjust seasoning accordingly.
    • Beans: Kidney, black, or pinto—your choice, I prefer black for color and flavor.: Drain and rinse to reduce excess sodium and improve texture.
    • Corn: Sweet and crunchy, adds a pop of color and flavor—frozen or canned.: For a fresher taste, use fresh corn in summer.
    • Taco seasoning: I make my own with chili powder, cumin, paprika—skip the pre-made for control.: Adjust spiciness to your taste—less cayenne for kids.

    Tools of the Trade for Taco Soup

    • Large heavy-bottomed pot: For even heat distribution and enough space to simmer everything.
    • Wooden spoon: To stir ingredients without scratching your pot.
    • Chopping board and knife: For prepping vegetables and herbs.
    • Can opener: To get to the beans, corn, and tomatoes easily.
    • Ladle: To serve the soup smoothly into bowls.

    Step-by-step for a hearty, flavorful taco soup

    Step 1: Gather your ingredients and equipment before starting, so nothing gets forgotten in the heat of the moment.

    Step 2: Brown the ground beef in a large pot over medium-high heat until it’s nicely caramelized, about 8 minutes.

    Step 3: Add chopped onions and garlic, sauté until fragrant and translucent, 3-4 minutes.

    Step 4: Pour in the diced tomatoes, beans, corn, and taco seasoning. Bring to a simmer and let it cook for 20 minutes.

    Step 5: Taste and adjust seasonings—more salt, a squeeze of lime, or a dash of hot sauce if you like it punchier.

    Cues and Checks to Know Your Taco Soup is Ready

    • Meat is browned and crispy at the edges, not gray or soggy.
    • The soup smells rich and spicy, with a hint of smoky tomato.
    • Liquids have thickened slightly, no watery pooling.
    • The beans and corn are heated through, about 10 minutes simmering.

    Common Mistakes and How to Fix Them

    • Under-seasoned soup.? Add more seasoning if it tastes flat.
    • Lack of depth in flavor.? Simmer longer if flavors are dull.
    • Burnt bits at the bottom.? Stir more often to prevent sticking.
    • Over-salting, fix with a splash of water or a potato.? Don’t add too much salt at once.

    Hearty Taco Soup

    Taco soup is a comforting and vibrant dish made by simmering ground meat, diced tomatoes, beans, corn, and homemade taco seasoning in a large pot. It develops a hearty, thick texture with a spicy, smoky aroma, and is perfect for a quick, customizable meal that feels like a warm hug in a bowl.
    Prep Time 10 minutes
    Cook Time 20 minutes
    Total Time 30 minutes
    Servings: 6
    Course: Main Course
    Cuisine: American
    Calories: 350

    Ingredients
      

    • 1 pound ground beef or turkey or lentils for a lighter version
    • 1 medium onion chopped
    • 3 cloves garlic minced
    • 14.5 oz diced tomatoes fire-roasted preferred
    • 15 oz cans of beans drained and rinsed, choose kidney, black, or pinto
    • 1 cup corn frozen or canned
    • 2 tablespoons taco seasoning homemade or store-bought

    Equipment

    • Large heavy-bottomed pot
    • Wooden spoon
    • Chopping board and knife
    • Can opener
    • Ladle

    Method
     

    1. Start by heating your large pot over medium-high heat and add the ground beef. Cook, breaking it apart with your spoon, until it’s browned and crispy at the edges, about 8 minutes. The meat should smell savory and sizzle as it browns.
    2. Add the chopped onion and minced garlic to the pot with the beef. Stir well and sauté until fragrant and translucent, about 3-4 minutes. The mixture will turn slightly golden and fill the kitchen with a rich aroma.
    3. Pour in the diced tomatoes along with their juices, stirring to combine. Bring the mixture to a gentle simmer, allowing the flavors to meld for about 5 minutes.
    4. Add the drained beans, corn, and sprinkle in the taco seasoning. Stir everything thoroughly so the spices coat all ingredients evenly. Increase the heat slightly to bring the soup to a simmer.
    5. Lower the heat to maintain a gentle simmer, cover the pot partially, and cook for 15-20 minutes. During this time, the soup will thicken slightly, and the flavors will deepen. Stir occasionally to prevent sticking at the bottom.
    6. Uncover and taste the soup, adjusting the seasoning if needed with more salt, a squeeze of lime, or hot sauce for extra punch. Once the flavors are balanced and the ingredients are heated through, it’s ready to serve.
    7. Ladle the hearty taco soup into bowls, garnish with your favorite toppings like shredded cheese, sour cream, or chopped cilantro, and enjoy a comforting, flavorful meal.
    Once it’s bubbling and the flavors have melded, let it rest for 5 minutes off the heat. Ladle into bowls, garnish with shredded cheese, sour cream, and fresh cilantro if you’re feeling fancy. This soup is a forgiving, adaptable thing—feel free to toss in extra veggies or switch up the beans. It’s a warm, satisfying bowl that screams comfort, perfect after a long day or a chilly evening.

  • White Chicken Chili Recipe: A Cozy Twist for Cooler Days

    White Chicken Chili Recipe: A Cozy Twist for Cooler Days

    There’s something about making white chicken chili that feels like a quiet act of care. It’s a recipe I turn to when I want a comforting bowl without fuss. The blend of tender chicken, creamy beans, and zesty lime is like a warm hug in a bowl. Plus, it’s a great way to clear out the fridge when you need dinner fast.

    Why I Keep Coming Back to This Recipe

    It’s quick and forgiving, perfect for busy nights. The balance of spice, acid, and creaminess hits just right. Plus, it’s endlessly adaptable—substitute ingredients or adjust heat without fuss. Every spoonful feels familiar but always with a little twist of surprise.

    Breaking Down the Main Ingredients

    • Chicken breasts or thighs: Juicy, mild, soak up flavors well, cook quickly. Swap for turkey or tofu if you like.
    • White beans (Cannellini or Great Northern): Creamy and tender, they add body and mild flavor. Use chickpeas as a hearty alternative.
    • Green chilies and cumin: Bring smoky warmth, a hint of heat, and depth. Adjust to your spice preference.
    • Corn kernels: Sweet, juicy bursts of flavor, brighten the bowl. Frozen works just as well.
    • Lime juice: Brightens everything with a zesty kick, essential for freshness. Lemon can stand in if needed.
    • Sour cream or Greek yogurt: Adds creaminess and tang. Skim for a lighter version, or skip if dairy-free.
    • Cilantro: Herbaceous and fresh, sprinkle at the end for a pop of color and flavor.

    Tools & Equipment You Need

    • Large heavy-bottomed pot: For simmering everything evenly without sticking.
    • Sharp knife: Chopping chicken, veggies, and garnishes.
    • Measuring cups and spoons: Keeping your spices and liquids just right.
    • Wooden spoon or spatula: Stirring gently and scraping the bottom.

    Step-by-Step Guide to a Heartwarming White Chicken Chili

    Step 1: Start by gathering all your ingredients. Chop the chicken into bite-sized pieces. Dice the onion, garlic, and bell peppers. Open your cans of beans and corn. Measure out your spices.

    Cooking Checkpoints & Tips for Success

    • Chicken should be cooked through and tender, about 8-10 minutes after simmering.
    • Look for a creamy texture with beans and corn evenly heated.
    • Smell the spices blooming—garlic, cumin, and oregano should be fragrant but not burnt.

    Common Mistakes & How to Fix Them

    • Overly thick chili.? Too thick? Add a splash of chicken broth or water, then simmer gently.
    • Chicken still raw.? Undercooked chicken? Cover and cook 5 more minutes, then check again.
    • Spices sticking and burning.? Burnt spices? Lower heat and add a splash of water to deglaze.
    • Clumpy or grainy chili.? Lumpy texture? Whisk in a bit of cream or sour cream to smooth it out.

    White Chicken Chili

    This white chicken chili combines tender chicken, creamy beans, and sweet corn in a flavorful broth seasoned with cumin and green chilies. The dish is simmered until everything is warm, creamy, and fragrant, resulting in a comforting bowl with a smooth, hearty texture and vibrant flavors. It’s perfect for quick, nourishing dinners with a cozy, inviting look.
    Prep Time 10 minutes
    Cook Time 20 minutes
    Total Time 30 minutes
    Servings: 4
    Course: Main Course
    Cuisine: Comfort Food
    Calories: 350

    Ingredients
      

    • 2 chicken breasts or thighs chicken, cut into bite-sized pieces
    • 1 medium onion, diced
    • 3 cloves garlic, minced
    • 1 bell pepper diced bell pepper
    • 2 cans (15 oz) white beans (Cannellini or Great Northern), drained and rinsed
    • 1 cup corn kernels frozen or canned
    • 1 cup chicken broth or water
    • 1 teaspoon ground cumin
    • 1 can (4 oz) green chilies, diced
    • 2 tablespoons olive oil
    • to taste salt and pepper
    • 0.5 cup sour cream or Greek yogurt for serving
    • a handful cilantro, chopped for garnish
    • 1 lime lime, cut into wedges for serving

    Equipment

    • Large heavy-bottomed pot
    • Sharp knife
    • Measuring cups and spoons
    • Wooden spoon or spatula

    Method
     

    1. Heat olive oil in a large heavy-bottomed pot over medium heat. Add diced onion and cook until translucent, about 3-4 minutes, until it becomes soft and fragrant.
    2. Add minced garlic and diced bell pepper to the pot. Stir and cook for another 1-2 minutes until the garlic is fragrant and peppers soften slightly.
    3. Pour in the chicken broth, then add the chicken pieces and sprinkle with cumin, salt, and pepper. Stir to combine, then bring to a gentle simmer. Cook until chicken is cooked through, about 8-10 minutes, stirring occasionally.
    4. Add drained white beans, corn, and diced green chilies to the pot. Stir well and continue simmering for another 5 minutes, allowing flavors to meld and the chili to thicken slightly.
    5. Taste and adjust seasoning with salt and pepper as needed. The chili should be hot, fragrant, and creamy with a slightly thickened broth.
    6. Serve the chili hot, topped with a dollop of sour cream or Greek yogurt, sprinkled with chopped cilantro, and with lime wedges on the side for squeezing over each bowl.

    Notes

    For a spicier kick, add extra green chilies or hot sauce. To make it dairy-free, skip the sour cream and garnish with avocado slices instead.
    This chili isn’t just a meal; it’s a gentle reminder that comfort food can be simple and honest. Once you get the hang of it, it’s a quick fix for chilly evenings or when you need a little soul-warming. Feel free to tweak the heat or add extra lime for brightness. It’s a dish that invites personal touches, so make it yours and enjoy the process.

  • Serena Williams Tacos: A Power Play for Your Taste Buds

    Serena Williams Tacos: A Power Play for Your Taste Buds

    When I think about these tacos, I remember afternoons spent in my kitchen, feeling like a champion just slicing and searing. They’re my go-to when I need something satisfying but easy, quick to make after a long day. There’s a certain thrill in assembling each one, customizing with whatever I have left in the fridge.

    Why I Keep Coming Back to These Tacos

    Every bite feels like a small victory, a reminder that simple ingredients, handled with care, can create something extraordinary. It’s the flavor, yes, but also the process—the sizzle, the smell, the quick assembly—that keeps me returning. Plus, they’re forgiving; you can tweak and personalize endlessly, which makes each round unique.

    The Building Blocks of Power Tacos

    • Protein (beef, chicken, tofu): The core of your taco, should be well-seasoned and caramelized for maximum flavor.
    • Tortillas: Warm, soft, and pliable—choose corn or flour based on your mood or dietary needs.
    • Fresh toppings (cilantro, avocado, lime): Bright, refreshing, and essential for balancing richness with a zing.
    • Sauces (hot sauce, smoky chipotle, crema): Add a spicy kick or creamy coolness, depending on what your palate craves.
    • Seasonings (cumin, chili powder, garlic): The secret to making simple ingredients taste like a celebration.

    Tools of the Trade for Tacos

    • Cast iron skillet: For a deep, even sear and smoky flavor.
    • Sharp knife: For chopping toppings and proteins.
    • Spatula: To flip and handle the meat or tofu.
    • Tongs: For assembling tacos and handling warm tortillas.
    • Microwave or pan: To warm tortillas gently.

    Step-by-step to Taco Victory

    Step 1: Start by heating a cast iron skillet over medium-high heat, about 200°C (390°F).

    Step 2: While the skillet warms, prepare your fillings: chop some fresh cilantro, dice a ripe avocado, and squeeze lime juice.

    Step 3: Cook your preferred protein—beef, chicken, or even tofu—in the hot skillet until deeply caramelized, about 8-10 minutes.

    Step 4: As the protein cooks, warm your tortillas in a dry pan or microwave wrapped in a damp cloth.

    Step 5: Assemble your tacos: layer the protein, add fresh toppings, and drizzle with a spicy, smoky sauce.

    Cooking Checkpoints & Tips

    • Ensure your skillet is hot enough before adding meat—should crackle when hit with a splash of water.
    • Look for a deep brown caramelization on the protein—this adds flavor and texture.
    • Tortillas should be warm and pliable, not soggy or crackling—warm them gently, avoiding over-drying.

    Common Taco Troubles & How to Fix Them

    • Meat sticking or not caramelizing.? Use a higher heat, about 200°C (390°F), for better searing.
    • Tortillas cracking or drying out.? Cover tortillas with a damp cloth while warming, avoid over-drying.
    • Filling turning out dry or tough.? Add a splash of water and cover briefly if filling is too dry.
    • Juices running out and making tacos soggy.? Rest cooked meat for 5 minutes before slicing.

    Power Tacos

    Power Tacos are quick, satisfying handheld dishes featuring well-seasoned, caramelized protein nestled in warm tortillas, topped with fresh herbs and zesty sauces. The dish emphasizes simple cooking techniques like searing and assembling, resulting in a final texture that’s crispy on the outside and tender inside, with vibrant, colorful toppings that add freshness and brightness.
    Prep Time 10 minutes
    Cook Time 15 minutes
    Total Time 25 minutes
    Servings: 4
    Course: Main Course
    Cuisine: Mexican
    Calories: 350

    Ingredients
      

    • 1 lb protein (beef, chicken, or tofu) cut into strips or crumbles
    • 4 pieces flour or corn tortillas warm before serving
    • 1/2 cup cilantro chopped
    • 1 ripe avocado diced
    • 1 lime lime juice freshly squeezed
    • 2 tbsp hot sauce or smoky chipotle sauce for drizzling
    • 1 tsp cumin ground
    • 1 tsp chili powder
    • 2 cloves garlic minced
    • 2 tbsp oil for searing

    Equipment

    • Cast iron skillet
    • Sharp knife
    • Spatula
    • Tongs
    • Microwave or pan for warming tortillas

    Method
     

    1. Heat the cast iron skillet over medium-high heat until it starts to shimmer, about 2 minutes, and you hear a faint sizzle when testing with a drop of water.
    2. Add oil to the skillet, swirling to coat the surface evenly, and let it heat until it shimmers and begins to ripple.
    3. Add your protein (beef, chicken, or tofu) to the pan, spreading it out evenly without crowding, and let it cook undisturbed for 3-4 minutes.
    4. Use a spatula or tongs to flip the protein pieces, allowing them to sear on the other side for another 3-4 minutes until deeply caramelized and cooked through.
    5. Sprinkle cumin, chili powder, and minced garlic over the protein, stirring to coat everything evenly, and cook for another 1-2 minutes until fragrant.
    6. While the protein finishes, warm the tortillas in a dry pan or microwave wrapped in a damp cloth until soft and pliable, about 30 seconds.
    7. Transfer the cooked protein to a plate and let it rest for a minute, allowing the juices to settle for juicy, tender bites.
    8. Dive in and assemble your tacos: place a generous spoonful of protein onto each warm tortilla, then top with chopped cilantro, diced avocado, and a squeeze of lime juice.
    9. Drizzle hot sauce or smoky chipotle sauce over the toppings for a spicy kick, and add any additional garnishes you like.
    10. Serve immediately while the tortillas are warm, and enjoy these flavorful, satisfying Power Tacos that are crispy, juicy, and bursting with fresh flavors.

    Notes

    Feel free to customize with other toppings like sliced radishes, pickled onions, or cheese. Adjust spice levels with more or less hot sauce. Resting the cooked meat helps keep it juicy for perfect tacos.
    Wrapping up, these tacos aren’t just about taste but about celebrating raw, unfiltered power in every bite. Feel free to tweak the fillings—add pickled jalapeños for heat or a dash of queso for creaminess. The real joy lies in how you make it yours, messy and bold. So dig in, and let each bite remind you that cooking is your game, no matter the score.

  • Stanley Tucci’s Pasta alla Norma: A Tale of Bold Flavors and Nostalgic Comfort

    Stanley Tucci’s Pasta alla Norma: A Tale of Bold Flavors and Nostalgic Comfort

    Pasta alla Norma isn’t just a dish, it’s a story on a plate—rich, smoky, and bursting with summer’s best. It’s a nod to Sicily, where eggplants and tomatoes mingle in the sun and the air is thick with herbs. For me, making this feels like a small rebellion against the overly complicated, a reminder that honest food is often the simplest.

    Why I Keep Coming Back to This Dish

    The bold smoky eggplant paired with sweet tomatoes and fresh basil is always a comfort, reminding me of summer nights and family feasts. It’s imperfect, lively, and deeply satisfying—no fancy tricks, just honest food. When I want a meal that’s both nostalgic and lively, this is my go-to.

    Breaking Down the Flavors and Ingredients

    • Eggplants: I love their soft, smoky flesh—slice thin for crispiness or thick for melting texture. Swap with zucchini if allergies strike.: Adds smoky, tender bites that contrast with the acidity of tomatoes.
    • Tomatoes: Ripe, juicy heirlooms or canned San Marzano—either work. Use fresh in summer for bright sweetness.: Gives the sauce its vibrant, tangy backbone.
    • Garlic: Plenty of it—roughly chopped for aroma, crushed for punch. Skip if you’re sensitive—use shallots instead.: Builds a fragrant foundation that makes the dish sing.
    • Basil: Fresh, fragrant leaves—torn just before serving to preserve aroma. Oregano can add a different herbal note.: Lifts the dish with herby brightness.
    • Ricotta Salata: Salty, crumbly, and slightly sharp—if unavailable, feta works. Shave or crumble generously.: Adds a salty, creamy counterpoint to the smoky eggplant.

    Tools of the Trade for Perfect Pasta alla Norma

    • Large pot: To boil the pasta to al dente perfection.
    • Wide skillet or frying pan: For frying eggplants and making the sauce.
    • Slotted spoon: To remove eggplant slices without breaking them.
    • Chef’s knife: Chopping garlic, basil, and tomatoes efficiently.
    • Grater: For fresh ricotta salata or cheese.

    Cooking the Pasta alla Norma: Step-by-Step

    Step 1: Bring a large pot of water to a rolling boil. Salt generously—like the sea. Drop in your pasta and cook until al dente, about 8-10 minutes.

    Step 2: While the pasta cooks, slice eggplants into 1/2-inch thick rounds. Salt them lightly and let sit for 15 minutes to draw out bitterness, then rinse and pat dry.

    Step 3: Heat olive oil in a wide skillet over medium heat (about 160°C/320°F). Fry eggplant slices until golden and crispy, about 3-4 minutes per side.

    Step 4: In the same pan, sauté minced garlic and chopped tomatoes until fragrant and slightly thickened, about 10 minutes. Season with salt, pepper, and a pinch of red pepper flakes.

    Step 5: Drain pasta, reserving a cup of pasta water. Toss pasta into the sauce with a splash of reserved water to loosen it. Add fresh basil and grated ricotta salata.

    Step 6: Serve hot, topped with crispy eggplant slices and extra cheese if you like.

    Cooking Checkpoints & Tips to Keep in Mind

    • Eggplants should be golden and crispy, not soggy or burnt.
    • Tomato sauce should be fragrant and slightly thickened, not watery.
    • Pasta should be al dente—firm to the bite, with a slight resistance.
    • Taste and adjust seasoning before serving—balance the salt, spice, and acidity.

    Common Mistakes & How to Fix Them

    • Eggplants soaking up too much oil.? Use too much oil when frying? Drain on paper towels and sprinkle with a little salt.
    • Tomato sauce remains too runny.? Sauce too watery? Increase heat and simmer until it thickens.
    • Pasta turning mushy.? Overcooked pasta? Use a timer and taste test at 8 minutes.
    • Cheese melting into the sauce too much.? Adding cheese too early? Top just before serving for maximum flavor.

    Pasta alla Norma

    Pasta alla Norma is a vibrant Sicilian dish featuring al dente pasta tossed in a rich tomato sauce, topped with smoky fried eggplant slices, fresh basil, and crumbled ricotta salata. The dish combines the smoky, tender eggplant with the bright acidity of tomatoes, creating a hearty yet fresh flavor profile with a satisfying texture contrast.
    Prep Time 20 minutes
    Cook Time 30 minutes
    Total Time 50 minutes
    Servings: 4
    Course: Main Course
    Cuisine: Sicilian
    Calories: 550

    Ingredients
      

    • 400 g pasta (spaghetti or penne) al dente
    • 2 medium eggplants sliced into 1/2-inch rounds
    • 4 cloves garlic roughly chopped
    • 4 cups tomatoes chopped or crushed, or canned San Marzano
    • 1/4 cup olive oil for frying and sauce
    • 1 bunch fresh basil torn just before serving
    • 100 g ricotta salata shaved or crumbled
    • Salt Salt for salting eggplants and pasta water
    • Red pepper flakes red pepper flakes optional, for heat

    Equipment

    • Large pot
    • Wide skillet or frying pan
    • Slotted spoon
    • Chef’s knife
    • Grater

    Method
     

    1. Bring a large pot of salted water to a boil, then cook your pasta until al dente, about 8-10 minutes. Drain and set aside.
    2. While the pasta cooks, slice the eggplants into 1/2-inch thick rounds. Lightly salt them and let sit for 15 minutes to draw out bitterness; then rinse and pat dry with a paper towel.
    3. Heat a generous 1/4 cup of olive oil in a wide skillet over medium heat. Fry the eggplant slices in batches until golden brown and crispy around the edges, about 3-4 minutes per side. Remove and drain on paper towels.
    4. Add a little more olive oil to the same pan if needed, then sauté the chopped garlic over medium heat until fragrant, about 1 minute. Add the chopped tomatoes and cook until the sauce thickens slightly, about 10 minutes. Season with salt, pepper, and red pepper flakes if using.
    5. Once the sauce is ready, add the drained pasta to the skillet and toss to coat, adding a splash of reserved pasta water if needed to loosen the sauce. Tear fresh basil leaves and stir into the pasta.
    6. Shave or crumble the ricotta salata over the pasta, then gently top with the crispy eggplant slices. Serve immediately, garnished with extra basil and cheese if desired.

    Notes

    Ensure eggplants are crispy but not burnt. Adjust seasoning to taste before serving. Use fresh basil for best aroma and flavor.
    This dish is a testament to the beauty of simple ingredients coming together. The smoky eggplant, bright tomatoes, and fragrant basil create a harmony that’s both rustic and refined. Feel free to tweak the chili or cheese to match your mood. It’s one of those recipes that feels like a warm hug after a chaotic day, perfect for sharing or savoring quietly.

  • Jennifer Aniston Salad: A Quiet Revolution in Greens

    Jennifer Aniston Salad: A Quiet Revolution in Greens

    Jennifer Aniston’s salad is a lesson in simplicity. It’s a reminder that sometimes, the most straightforward ingredients make the best dishes. I’ve always loved how it balances brightness and crunch, especially on days I need a quick, nourishing bite.

    Why this salad keeps calling me back

    It’s honest and quick, perfect for busy days or when I need a reminder that simple can be satisfying. The lemon zest and fresh herbs wake up tired taste buds. Plus, it’s endlessly tweakable, which keeps things interesting.

    Breaking down the ingredients

    • Mixed greens: Fresh, crisp, and slightly bitter; the backbone of the salad.
    • Lemon juice: Brightens everything with a zesty, citrusy punch—use fresh for best flavor.
    • Olive oil: Rich and fruity; it coats the greens with a glossy sheen and mellow flavor.
    • Dijon mustard: Adds a subtle kick and emulsifies the dressing for a smooth finish.
    • Herbs (parsley, basil): Fresh herbs add a burst of aromatic freshness and color.
    • Salt and pepper: Essential for balancing and highlighting flavors.
    • Cherry tomatoes (optional): Juicy and sweet, their burst of acidity complements the greens.

    Tools of the trade for a crisp, fresh salad

    • Salad spinner: Dry greens thoroughly to keep the salad crisp.
    • Chef’s knife: Chop vegetables and herbs evenly.
    • Small bowl: Mix the dressing.
    • Large salad bowl: Combine ingredients for serving.

    Step-by-step to a vibrant Jennifer Aniston Salad

    Step 1: Gather your ingredients and tools first — a good salad needs good prep.

    Step 2: Wash and dry the greens thoroughly; a salad is only as good as its crispness.

    Step 3: Chop the vegetables and herbs finely, aiming for even pieces that distribute flavor.

    Step 4: Mix the dressing separately: olive oil, lemon, Dijon, a pinch of salt and pepper.

    Step 5: Toss everything gently but thoroughly, making sure each leaf gets coated.

    Step 6: Taste and adjust the seasoning — lemon juice or salt can lift the flavors.

    Step 7: Let the salad sit for about 5 minutes to marry the flavors, then serve.

    Cooking checkpoints and tips to keep in mind

    • Greens should be crisp and vibrantly green, not wilted or yellow.
    • Dressing should be bright and tangy, not oily or bland.
    • Vegetables should be chopped uniformly for even flavor.
    • The salad should sit for a few minutes to allow flavors to meld, but not too long that greens wilt.

    Common pitfalls and how to fix them

    • Greens are limp or yellow.? Use fresh greens; wilted or old leaves turn bitter.
    • Dressing is bland or overly oily.? Taste your dressing before applying; adjust acidity and seasoning.
    • Unevenly chopped vegetables.? Chop ingredients uniformly for even flavor distribution.
    • Salad is soggy or greasy.? Don’t overdress; start with half the dressing and add more as needed.

    Jennifer Aniston’s Simple Green Salad

    This fresh and vibrant salad combines crisp mixed greens with bright lemon dressing, fresh herbs, and optional cherry tomatoes for a quick, nourishing bite. The key techniques involve thorough washing, chopping, and emulsifying the dressing, resulting in a crisp, flavorful dish with a lively appearance.
    Prep Time 10 minutes
    Total Time 10 minutes
    Servings: 4
    Course: Main Course
    Cuisine: Healthy
    Calories: 120

    Ingredients
      

    • 4 cups mixed greens fresh and crisp
    • 1 tablespoon lemon juice freshly squeezed
    • 3 tablespoons olive oil fruity and rich
    • 1 teaspoon Dijon mustard
    • 2 tablespoons chopped fresh herbs parsley and basil
    • to taste salt and pepper
    • 1 cup cherry tomatoes optional, halved

    Equipment

    • Salad spinner
    • Chef’s knife
    • Small bowl
    • Large salad bowl

    Method
     

    1. Place the mixed greens into a salad spinner and rinse thoroughly under cold water.
    2. Spin the greens until completely dry and transfer them to a large salad bowl.
    3. Finely chop the herbs and set aside.
    4. Cut the cherry tomatoes in half if using, and add them to the greens.
    5. In a small bowl, whisk together lemon juice, olive oil, Dijon mustard, and a pinch of salt and pepper until the dressing is smooth and slightly emulsified.
    6. Pour the dressing over the greens and gently toss to coat every leaf evenly, watching for a bright, glossy appearance.
    7. Sprinkle the chopped herbs over the salad and give it a final gentle toss to distribute the herbs evenly.
    8. Taste the salad and adjust seasonings with more salt, pepper, or lemon juice as needed.
    9. Let the salad rest for about 5 minutes to allow flavors to meld and greens to absorb the dressing.
    10. Give the salad a final gentle toss, then serve immediately for maximum freshness and crunch.
    This salad isn’t just a side, it’s a small act of rebellion against overcomplicated dishes. It’s honest, fresh, and feels just right after a long day. Feel free to tweak the herbs or add a handful of nuts for crunch. Wrap it up in a clean cloth and enjoy straight from the bowl — no fuss, just pure, honest greens.

  • Hello world!

    Welcome to WordPress. This is your first post. Edit or delete it, then start writing!